Proper screen scaling was added to Lode Runner several months ago but I thought I'd do a quick write up for those that like to know more of the behind the scenes workings.
No scaling
As you can see in the image above, the game window was previously not scaled. The game launched into 640 x 480 (screen resolution the original assets were indented to be drawn in) which resulted in pillar boxing (shown in red).
This did work perfectly but being 2016, pillar boxing isn't really acceptable.
Instead, we now draw the background thatching tiled in the background and I think you'll agree that it looks much nicer!

Now with background
To do this, we follow these steps:
-
Get a list of all of the available 4:3 resolutions that your adapter supports, ignoring anything below 640 x 480 and anything larger than your current resolution.
Lode Runner was designed for 640 x 480, a 4:3 ratio, so we need to also use the same ratio to keep all assets looking beautiful. -
Set the backbuffer size to what you've selected in the game's settings (if first run, use nearest display mode to your current).
We also need to keep track of the new scale:
_Scale = VirtualDisplay.Width / 640
For example, this monitor I'm using right now is using 2560 x 1440 which is a 16:9 widescreen.
The nearest 4:3 size is 1920 x 1440 so that's what is used.
The scale value will become 1920 / 640 = 3
- Draw the tiled background image using the Linear Wrap sampler state to automatically tile the image to fill the screen. This is approx. ~15ms faster than manually doing it.
The position to start drawing at is scaled by the above value so it starts in the correct position in all chosen resolutions.
spriteBatch.Draw(background, New Vector2(xOffset, yOffset), New Rectangle(0, 0, GraphicsDevice.Adapter.CurrentDisplayMode.Width, GraphicsDevice.Adapter.CurrentDisplayMode.Height), Color.White, 0, Vector2.Zero, Display.Scale, SpriteEffects.None, 1)
-
To be able to easily scale the entire game without doing so during every draw call for each element, we render the game to a Render Target that's 640 x 480 (Lode Runner's native size) so everything is drawn perfectly.
This new texture is then drawn centred on the screen. -
The editor's toolbox and the UI system's tooltips are also drawn to their own Render Target before hitting the screen. This is so a) the toolbox can be dragged outside of the original 640 x 480 screen and b) the tooltips are drawn on top of all other elements.
The toolbox could be drawn regular size then scaled but that leads to other issues like 'trapping' the box inside a 640 x 480 region. The easiest solution is to just draw to a Render Target using the current resolution settings. This way tooltips can be drawn anywhere on screen and the toolbox is free to roam. The end result is simply scaled by the above _Scale factor.
Because of the 'composited' end result, mouse picking the toolbox becomes difficult.
The toolbox position and its controls are scaled by the difference of the native resolution and the game's scaled position.
_ScaleOffset = New Point(((_device.PreferredBackBufferWidth / _Scale) - (VirtualDisplay.X / _Scale)) - 640, ((_device.PreferredBackBufferHeight / _Scale) - (VirtualDisplay.Y / _Scale)) - 480)
VirtualDisplay holds centred location of the game on screen and the 4:3 resolution.
For example, this works out as:
x = ((2560 / 3) - (320 / 3)) - 640 = 107
y = ((1440 / 3) - (0 / 3)) - 480 = 0
This means the toolbox position is offset by this amount and then mouse picking will work perfectly!
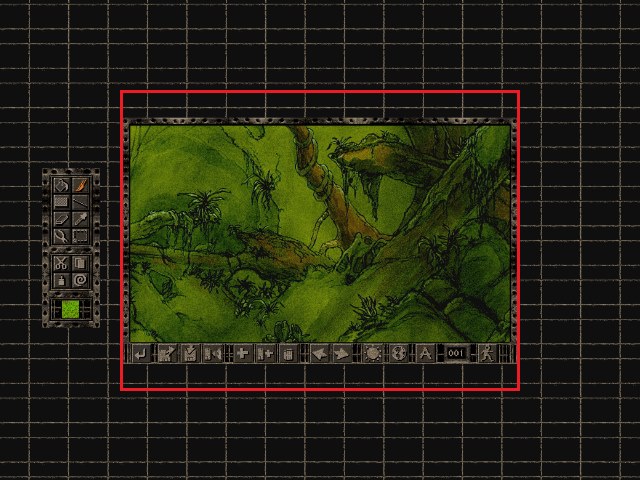
Final product (red outline showing the original window)